
Do you intend to launch a WordPress e-commerce site? There is a lot to it, therefore I want to create a series on it to give some specifics on all the many parts of setting up and utilizing WooCommerce.
WordPress was made to operate with WooCommerce, an e-commerce plugin. You may build an online store using this open-source platform and sell goods and services directly to clients. Products management, order management, and payment gateway integration are just a few of the services that WooCommerce offers. Additionally, a variety of extensions, both free and paid, are available to assist you improve the functionality of your business.
How to Install WooCommerce?
You must already have a WordPress website in order to install WooCommerce. You must first install WordPress if you don’t already have one on your website. After setting up WordPress, install WooCommerce by following these instructions:
Step 1: Log in to your WordPress dashboard
Step 2: Go to the “Plugins” section and click “Add New”
Step 3: Search for “WooCommerce” and click “Install Now”
Step 4: Once the plugin is installed, click “Activate”
You’ll be requested to create your store when WooCommerce has been activated. Setting up delivery options, taxes, and payment channels will be required.
Payment Gateways
Set up at least one payment gateway if you plan to engage in online business.
A payment gateway is a type of technological platform that enables businesses to receive online payments from clients. It acts as a link between the merchant’s website or application and the acquiring bank or payment processor. Usually, payment gateways manage the authorisation and execution of electronic transactions, ensuring that sensitive client data is delivered securely and that the transaction is finished promptly.
The payment gateway securely transfers the customer’s payment information, including credit card information, to the payment processor or acquiring bank for authorisation when a customer makes a purchase on a merchant’s website.Once the payment has been approved, the payment gateway relays the transaction information back to the merchant’s website so that the sale may be finalized.
WooCommerce supports 84 different payment gateways, at least. How do you decide what to pick? Here are a few of the most well-known.
PayPal: A popular payment method with a quick and simple checkout procedure is PayPal. It provides a variety of payment methods, including credit/debit cards, bank transfers, and PayPal balance, and it enables both one-time and monthly payments. The PayPal Standard, PayPal Checkout, and PayPal for WooCommerce plugins are already supported by WooCommerce.
Stripe: Stripe is a well-known payment processor that offers a simple checkout procedure, accepts a variety of payment options, and offers cutting-edge features like subscription billing and fraud prevention. Online businesses frequently utilize Stripe, which has a developer-friendly API.Stripe has an official WooCommerce plugin that enables merchants to accept payments through Stripe.
Square: Square is a payment gateway with several functions, including accepting card payments, creating invoices, and managing inventory. Additionally, Square provides a user-friendly point-of-sale (POS) system that works both online and offline. The Square plugin for WooCommerce offers connectivity with the Square POS system and allows retailers to accept payments through Square.
It’s vital to remember that the acceptance of payment gateways might vary based on the target market, industry, and region. Make sure the one you choose is one that your clients will want to utilize.
What payment gateway can I use that won’t charge fees?
I frequently am asked this question. And I’ll tell you what: none of them. Payment gateways provide a service to you. They are not a nonprofit. Expect to pay for that service if you wish to utilize it. Understand that it is against the terms of service if you attempt to circumvent it by utilizing PayPal “friends and family” payments or a personal VenMo account for your company.
Installing and Using your Payment Gateway
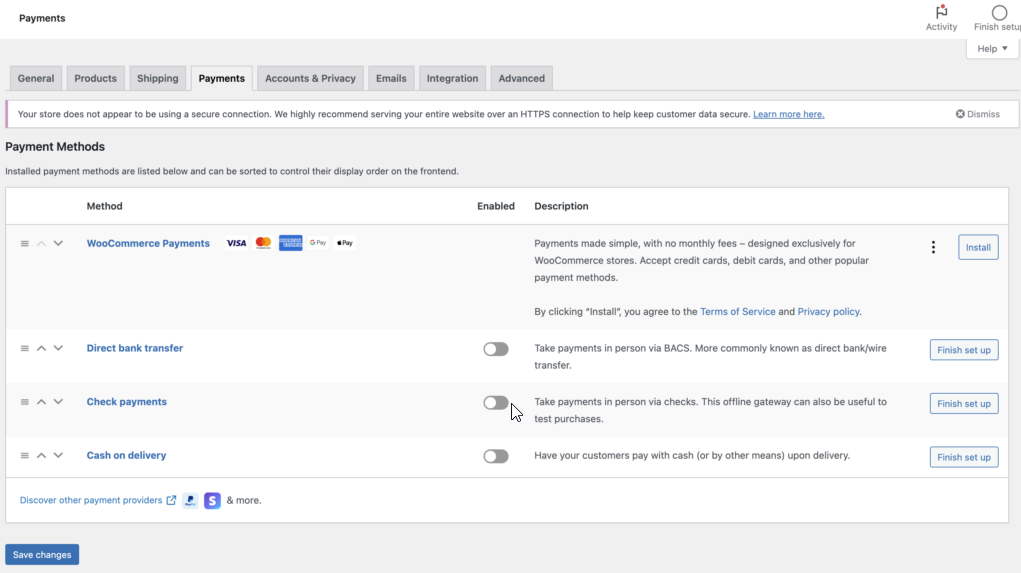
Because they are aiming to steer their consumers into utilizing WooCommerce Payments as their payment gateway, your options after installation basically come down to variants of pay later or using WooCommerce Payments. Additionally, this isn’t a terrible choice if you want to provide online sales but also use your e-commerce store for in-person sales because an in-person card reader costs $80. (View the prices here.) Rates vary by nation, however in the US, a transaction costs 2.9% + $0.30. (Which is a fairly typical rate, shared by Square, Stripe, and WooCommerce Payments.)
Stripe
Personally, I advise using Stripe if you just want online transactions. It just functions incredibly well and is simple to set up and integrate. On Stripe websites, I have seldom seen problems. Per transaction, Stripe costs 2.9% plus $0.30.
What about PayPal?
When it comes to PayPal, my comment is standard. I enjoy PayPal. Since I started purchasing items on eBay in the late 1990s, I have been a PayPal customer. Include PayPal as a payment option on your website if you share your users’ preferences. But I wouldn’t advise using it as your only choice. PayPal will be used for checkout by users and fans of the service. If PayPal is the sole payment option, those who don’t currently use it or don’t have PayPal accounts are far more likely to cancel their order.
I’m referring particularly to PayPal Standard, which allows you to quickly complete your purchase by leaving the shopping basket and entering PayPal. Different are PayPal connections, which work on your site just like any other gateway. However, if that’s your only choice when it comes to PayPal’s standard, you’ll probably lose purchases. “However, people can still checkout even if they don’t have a PayPal account.” When I advise folks not to use PayPal as their sole choice, it is the typical response I receive. This is accurate. But those who don’t currently use PayPal are unaware of that.
When it’s time for people to give you money, I advise against making them work extremely hard.
Additionally, PayPal raised its transaction costs, which are currently 2.99% + $0.49.
Setting it up
You must install and setup the plugin for the payment gateway you wish to use, unless you choose to utilize WooCommerce Payments. You must link the plugin to your payment gateway and your website after installation and activation; you cannot stop there. The majority of the time, it’s fairly easy. You switch back to your website after activating your plugin, connecting to your payment gateway by clicking a button, and logging into your account there. Naturally, everything depends on whether your payment gateway is already configured, so pick one out and get it set up first. Connect it next using the appropriate plugin. Here is a collection of resources for
WooCommerce Payments
Stripe
Square
PayPal
These gateways are all ones I’ve used and recommend, but they might not be the best alternatives if you live somewhere else. To make sure you choose the greatest option for you, you should consider your options.
Stay tuned for the next installment in the series on how to customize and set up your taxes.